
As long as I can remember, I've loved looking at stained glass--windows, lamps, trinkets. Our Jewish temple had some old stained glass windows that I would look at when I was a kid. They looked dirty and dull from the outside, but they came alive when you looked at them from inside the sanctuary. They held my attention more than anything else on Sunday mornings.
It's odd that I did not try my hand at making stained glass objects until I was 42 years old. I had been immersed in other art forms--music, writing, dance, ceramics--but when I saw a beginning stained glass class offered in a community education brochure one day, it seemed like the right time in my life for it.
My first stained glass class was in the fall of 1991, when I took a very basic, 4-week class in which I completed one object--a blue butterfly with about 5 pieces of glass. We learned to cut the glass (and our hands!) according to a printed design, cover the edges with copper foil, and solder the pieces together. The butterfly is long-since lost, but I still remember how difficult it was to do and how proud I was to finish it.
The class was taught by an instructor named Brian Helgerson, and we hit it off immediately. He was a master glass craftsman who owned a shop called Sundance Glass, so I decided to take classes from Brian at his shop after the community education class was done. That class started on Thursday night, November 7, 1991, which happened to be the day that Magic Johnson retired from the NBA, according to my always-handy calendar.
Glass Fusing
From the moment I stepped into Sundance, I was enthralled. There were so many glass works on display and for sale, so many colors and shapes and sizes, with pieces of glass in every nook and cranny. There were 2' x 3' sheets of glass stacked vertically on shelves, counters filled with supplies you might require, rotating spindles with all types of books about glass-making. The front room was Brian's retail shop, but you could readily view the very large back room studio with rows of work tables, glass-firing kilns and unfinished projects scattered everywhere.
With a class of about eight people, Brian chose to first give us a glass fusing assignment. He showed us how to cut glass properly. We could choose from several available colors and were asked to cut different shapes and to place them in some cohesive design, with smaller pieces laid upon a larger background piece. I chose to make an abstract form of an exotic flower, which is about 5 inches wide. The white, pink and green pieces (below) were laid upon the dark red piece of glass for the firing.

Our little designs were fused in the kiln and waiting for us the next week. Because the glass is fused to a very high temperature, all of the sharp edges disappeared as the pieces fused together. You never really know what you're going to get with a glass fusing project until it comes out of the kiln. I was quite pleased with the result, and this little flower has sat on my desk for the last 27 years. Still, glass fusing was not the goal for me, so this was the only fused piece I ever did. I wanted to get into making real stained glass pieces.
Hummingbird
Our second project was to be a small stained glass piece that did not require firing in a kiln. Brian had dozens of design books from which we could choose a simple pattern, and I chose to do a ruby-throated hummingbird. It looked simple in the book, but it turned out to present many challenges. After tracing the design onto a sheet of white paper, I was ready to begin.

I chose the glass I wanted to use--small pieces of white, red, black, dark green, and a variegated green glass. The white and variegated green pieces allowed a lot of light to shine through them, while the other colors were more opaque.
When you cut glass, you first use a tool to "score" it, which leaves a very shallow, scratch-like line in the glass. Then you hold the glass on either side of the score line and snap it suddenly and with just the right amount of pressure, and hopefully the glass breaks cleanly along the score line. However, there are many potential problems in doing a small design like the hummingbird, which measures about 10-1/4 inches from wingtip to wingtip. I quickly learned about these issues:
- Glass wants to break in a straight line, not a curved line. When you add the score line, the break will follow that line if it is very gently-curved, because you've slightly weakened the glass along that line. The break will not follow a sharp curve. To achieve the shape of the hummingbird's tail, I first tried to create the approximate shape of a diamond, and then I used a glass grinder (wearing goggles!) to grind away excess glass to achieve the convex curves on the sides and bottom and the concave curve on the top. Using a grinder takes a lot of time; if you press the glass too hard against the grinder, it will break, and small shards of glass can easily splinter away. Smooth curves are usually accomplished by using a grinding or sanding instrument.
- Larger pieces of glass are much easier to cut than smaller pieces of glass. The hummingbird's beak, although formed by straight-line cuts, was very difficult to make, especially near the tip. You can break several pieces of glass before you achieve the exact shape you want. The most difficult piece to cut for the hummingbird was the upper right piece on the wing, because it had two thin, sharp points.
- After you cut each piece of glass, you put copper foil around its entire border. The solder will then adhere to the copper, not the glass. Brian only taught the copper foil method of holding pieces together, not the pre-formed, leaded groove method. Copper foil can be very difficult to work with. Again, the sharp points presented the biggest challenges when foiling the glass pieces.
- It takes a lot of practice to be good at soldering glass pieces together. You have to work at just the right speed--too fast and your solder lines will be too thin and have gaps, while too slow will result in solder lines that are lumpy and irregular. If the solder gets too hot, it becomes too liquid and drops between the foil cracks! The solder line around the white body of my hummingbird is pretty good, because it has an even shape and texture around the whole border. However, the solder is a little too thick around the red throat and the end of the black beak.
- Notice that the eye of the hummingbird is a dollop of solder, and the two chain eyelets are also attached with solder. Doing anything fancy with solder is a real challenge.

This piece also taught me a great lesson about stained glass colors. Not only do the colors change in different light conditions, but they must work together in any light condition. Notice how much more yellow comes out in this half-light setting, unlike the first photo. I love the surprising changes in color that you see with stained glass.
Tulips
Although the hummingbird project only involved 12 pieces of cut glass, I chose to work on a tulip window design containing 67 pieces for my next project. A new class was beginning at Brian's studio in January, 1992, and he encouraged me to do a larger project that presented more challenges. I also met another glass artist, Shannon Kindle, who had her own studio right next to Brian's studio. Since Brian's studio was often open during the weekends and I was free to work there, I often visited Shannon to ask her questions or see her incredible glass projects. She specialized in complex glass sandblasting projects such as walk-in shower doors or restaurant room dividers, and her creations were unbelievably beautiful.
The tulip project presented different challenges and called for new techniques. The border of the window was built with grooved metal strips for the glass to fit in. The top and left strips were first soldered together at a right angle, and they were secured to a large breadboard so they couldn't move. I had found the tulip design in a book and had expanded it on paper (using a copy machine) to be about 15" by 21". That design was pinned to the breadboard, and the metal border strips were cut to fit the circumference of the design.
Then I began to cut and place the pieces of glass on the paper, starting in the upper-left corner and working toward the bottom-right corner. For the first time, I was using clear glass for part of my design, so I had to choose a piece of glass with no flaws in it. The green and red sheets of glass were both chosen for the degree of texturing in the glass. The green glass had long streaks of texturing in it, which was perfect for the tulip leaves and stems. The red glass had a little less texturing, perfect for the tulip bulbs.

Many of the glass pieces were long and narrow, and those are especially easy to break in half if you're not really careful, so my glass cutting and snapping techniques had to improve from what I did in the first projects. Again, as each piece was cut, I used copper foil on the edges for soldering later on.
I should explain the foiling step more precisely. If you imagine the glass to be 1/8-inch thick, the foil, which is sticky on one side and a thin layer of copper on the other, should be a little wider than the glass thickness--perhaps 3/16-inch wide. You would place the foil evenly around the edges of the glass and fold the foil onto the glass on either side. If folded perfectly, this would leave 1/32-inch of overlap on each side of the glass. When two adjacent pieces of glass are properly cut and placed together, their edges should exactly touch, and the copper foil will then provide about 1/16-inch of surface for the solder. If the pieces are not cut properly, gaps will appear between the copper-foiled edges, and you don't want that. Notice in the photo below how the seams are very even and narrow. Each seam is really two pieces of copper foil lying against each other!

This detail photo also shows how the pieces of glass are fit into the metal strip and the solder lines go right to the metal strip. This provides a very solid fitting for the glass. Please note that the tulip window is set inside one of our kitchen windows, so part of what you see is the kitchen window itself.
I worked about 50 hours on the tulip window. All of the pieces were cut by March 5, 1992, and they were all soldered by March 14, 1992. That was before I moved into my current house and discovered how perfectly the tulips fit into our kitchen window. If I ever were to take up glass cutting again, I'd do another window of the same size to fit our matching kitchen window.
Tiffany Lamp
Once I had completed the tulip window, I decided I was ready to tackle a much larger project, so I began Brian's stained glass lamp class on March 24, 1992. My ultimate goal when I began working with stained glass was to do a Tiffany lamp, and I thought I had the skills to do one after working with tulips for weeks. Each Tuesday evening class lasted for 3 hours, and I was free to work in the studio on Saturday and Sunday afternoons, so I began to keep a log of all my hours spent on the project. Little did I expect to spend almost 300 hours on the lamp before it was finished!
Brian carried a line of fiberglass molds which were imprinted with original Tiffany designs, and I chose Tiffany's famous pansy design. If you google "Tiffany pansy lamp," you'll see many versions of the same design. Below is one of many available on the internet. The vendor quotes 25 days (200 hours) to make one lamp, and I'm not surprised.


The overall lamp has four identical quadrants, so every piece you see is repeated four times. There are no guidelines in the instructions or on the mold as to what colors you should use, so I chose all of my own colors and did not repeat them from quadrant to quadrant. Note that my background color is uniform (a cream color) for the whole lamp, while the background color on the sample lamp is darker near the lower rim, perhaps giving the impression of the pansies lying in a green garden. Since the internet didn't exist 26 years ago, I really had no guidelines for choosing colors, and you'll see a wide variety of color patterns on the internet.
There are other notable differences between the two lamps. I like that the studio's lamp uses three shades of green for the leaves and stems, where my lamp only uses one shade. Also, I interpreted some of the smaller interior pieces (like the piece immediately below the pink flower) as being the background color bleeding through, which I think defines the flowers, leaves, and stems a little bit more. Finally, the sample lamp had glass available that was a little more textured (variegated). Only my blue flower shows much shading within each piece. Regardless, I'm very pleased with the colors I chose for my lamp.
I remember Brian told us that there used to be hundreds of glass companies in the United States, but in 1992 there were only seven or eight left. He sold glass from the Bullseye Glass Company in Portland, Oregon, still thought today to be one of the best sources of glass in the world. I had the pleasure of visiting the Bullseye store once in Portland, and it held all of the magic of a music store for me.
Work progressed slowly on the lamp, primarily because there were so many tiny pieces, each one of which had to be cut, shaped with a grinder, and foiled. The centers of flowers were especially hard to cut and foil. I used two sizes of copper foil. Where I wanted very thin solder lines, such as in the centers of flowers, I used a very narrow foil. As I would finish each piece, I would stick a very tiny ball of wax on the back of the glass and stick it to the mold. None of the soldering was done until all of the 700+ pieces were cut, foiled, and stuck to the mold. In this process, I was very careful to not leave any gaps between adjoining pieces; they had to be cut and foiled just right.

Above is a photo of me working in Brian's studio, probably on a Saturday afternoon. The lamp at this point was more than half done, and so you can see lots of copper-foiled pieces stuck to the white fiberglass mold in front of me. (None of the pieces had been soldered together yet!) To my right on the table are several glass-cutting tools, and in the foreground you'll notice the lid to a cardboard box, which contains lots of miscellaneous pieces of glass and a larger sheet of green glass, most of which could still be used. Finally, behind me on the workbench is the grinder I used in the detailed shaping of each piece. In addition to wearing goggles, the light lamp with its large magnifying glass also served to protect my eyes.
I worked on the Tiffany lamp two or three times a week for the rest of the year and into 1993. I finished cutting all of the pieces on March 13, 1993. During the next week I spent about 5 hours doing a rough solder over the entire outer surface of the lamp. For a rough solder, you don't care if there are small gaps or lumps in the solder; you just want to solder all of the adjoining edges so they'll hold together when the lamp is removed from the mold. That glorious day came on Saturday, March 20, 1993, when Brian, Shannon, and I used hand-held hair dryers to melt all of the tiny pieces of wax holding the lamp to the mold. Below is a photo of Shannon and me using the studio's hair dryers on the lamp shade.

Using the hair dryers to melt the wax is a harrowing process. It has to be done fast, but not too fast, so that all of the wax stays viscous enough to lift the lamp from the mold. When we thought the lamp was ready to separate from the mold, all three of us lifted the bottom edge simultaneously, being very careful not to deform the shape. It worked! Below is a photo of me holding the lamp immediately after we had lifted it from the mold. In my hands it felt surprisingly solid, primarily because the pieces fit together so well.

The lamp shade was stable enough, even after one rough solder, that I could tilt it to catch the afternoon light streaming into the studio. The photo below gives a good view of the lamp shade's concentric circles and center hole, without the top ring and plate, which were added later. This is also a nice view of how some of the colors looked in direct sunlight.

Then began the arduous task of soldering and re-soldering and re-soldering. Over the next five weeks I spent 26.5 hours on soldering. First I worked on the entire inner surface of the lamp, as shown in the photo below. This was not the same "rough" solder method, but a very careful smooth soldering, where I tried to get all of the borders and joints with the desired, consistent "look." Small pieces had thin solder lines, while the larger pieces had slightly-thicker solder lines.

After soldering the inner side completely, I went back and soldered the outer surface just as carefully, because both sides had to have even, consistent solder lines! But that created a problem: as you smooth out a solder line on one side of the lamp, it can thicken or distort the same solder line on the other side, because the solder, when it's hot, wants to drip through to the other side. So, I returned to the inner side and worked with a very light hand on all of the lines that had been distorted. Finally, I returned to the outer surface and did the same minor repair work on all of those solder lines.
 When I had finished with the repair work, I had soldered the outer side three times and the inner side twice. The lines were not copper-colored, but a shiny, light-colored gray from the solder. The line soldering was finished on April 25, 1993.
I had combed through many catalogues to find just the right base for the lamp. As a rule of thumb, the distance between the bottom edge of a lamp shade and the table it sits on should equal the diameter of the lamp shade, so I had to find a base that suited the size of the shade.
After the line soldering was done, I spent an afternoon soldering the base's top ring and plate to the top rim of the shade. This was more difficult than it would seem, because the ring had to be exactly level with the shade's bottom rim, so the lamp would stand straight and not tilt. As with every step in the process, Brian helped me with the leveling, but I did all of the soldering.
I could have left the solder lines gray, with the idea that they would age and darken over time, but I wanted them to match the bronze-colored base and top plate, so the only thing to do was to carefully apply a bronze patina finish to all of the solder lines--on both the inner and outer surfaces of the lamp shade. The patina was a liquid that could be applied with a small brush. The difficult part was making sure that all of the excess patina was wiped off the glass. I worked for 10-1/2 hours on the patina step, and it was finally finished on Saturday, May 8, 1993.
The above photo gives a good view of one section of the shade. What I'm probably most proud of is the uniformity of the solder lines. Some lines are intentionally thinner than other lines. If you look at a Tiffany lamp available in any glass store, you'll notice how non-uniform the solder lines are, which indicates that pieces were cut quickly and gaps were filled with solder. Many times I was not happy with how I had cut a piece of glass, so I cut another piece to replace it. That is one of the reasons the lamp took so long to make--an average of about 25 minutes per piece. If I finished cutting 7 pieces in a 3-hour class, it was a good evening!

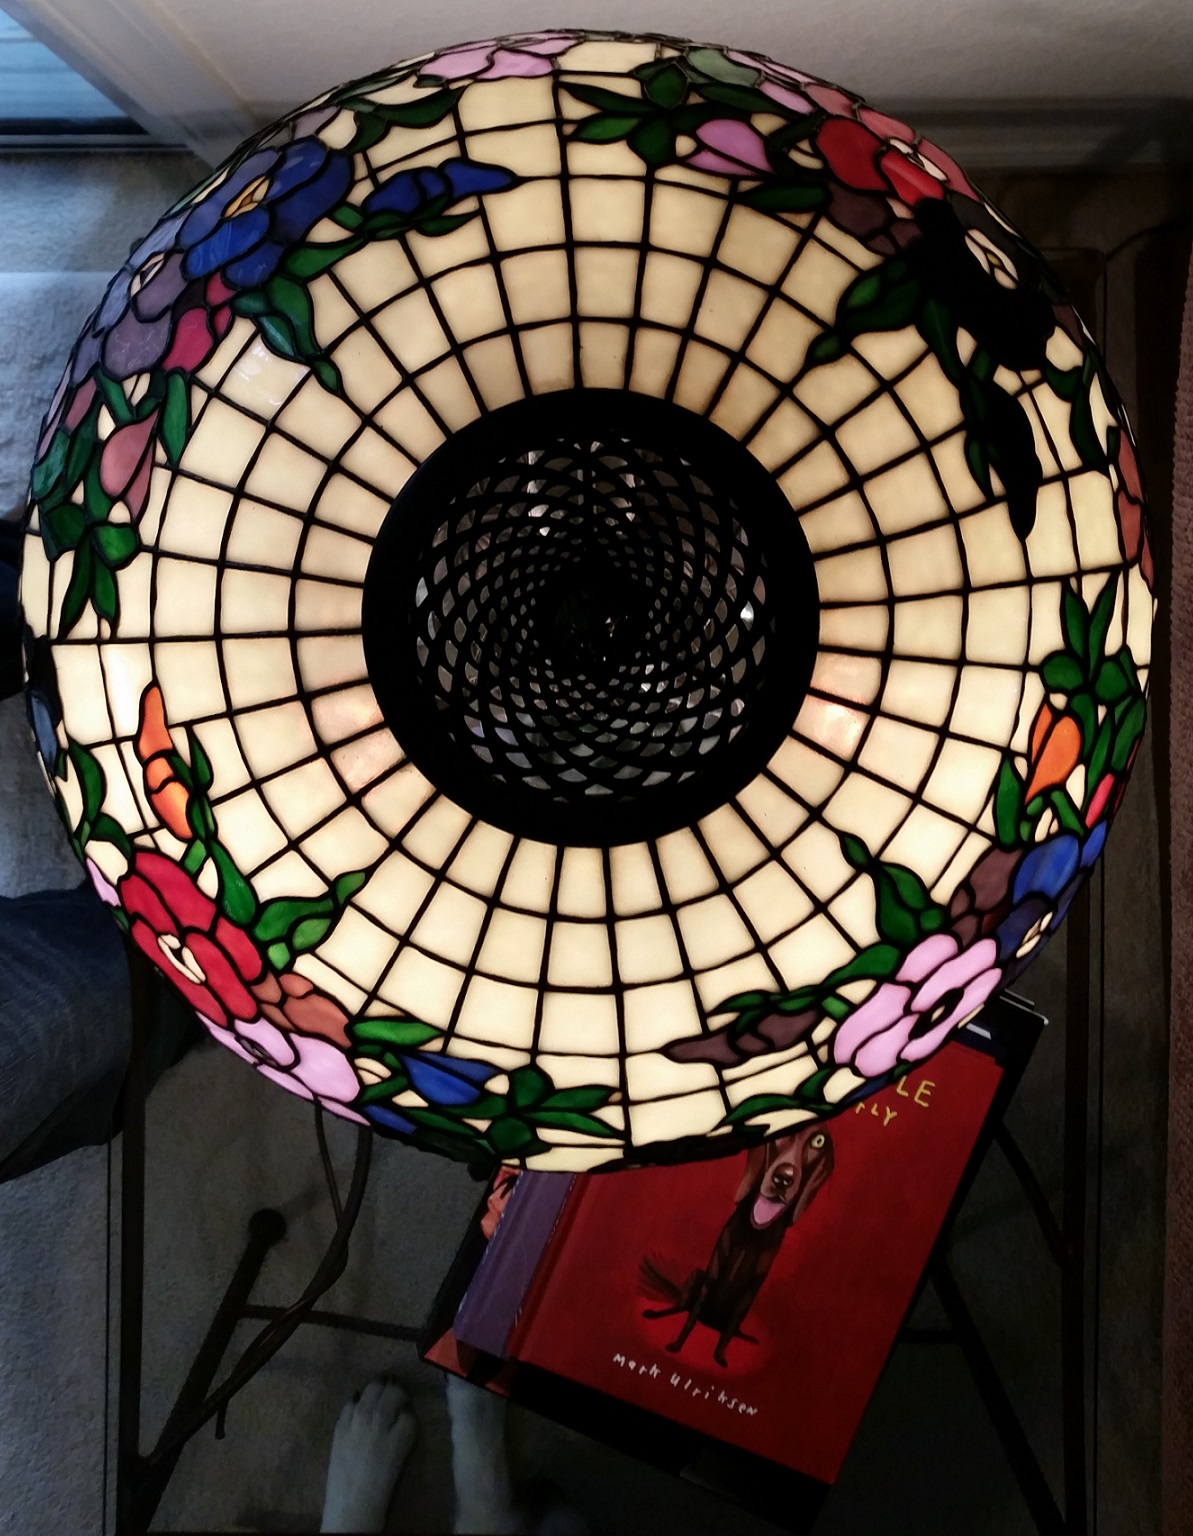
The official completion date for the lamp was May 8, 1993, although I didn't actually receive the lamp base until a couple weeks after that. By then I spent almost 14 months working on my lamp, but it was all worth it. Above is a photo of the lamp with its bronze base. We've displayed the lamp prominently in our living room for the last 25 years. It currently sits on a custom-made, bronze and glass side table (which was made by an artist in Arizona). In the photo below you can see the top of the lamp and parts of all four quadrants. Resting on the table are a couple of books, the top one of which is one of our favorites, "Dogs Rule." Only after cropping this photo did I notice the front paws of our dog, Cooper, below the clear glass table surface near the bottom. Yes, dogs rule!
Although most of the work was done in Brian's glass studio, a small percentage of the work was done elsewhere. For two weeks prior to Christmas, 1992, Brian invited me to work in a holiday retail shop he'd opened, so customers could see glass work in action. I also worked at a couple street fairs where he had booths, and during those days I never left the lamp shade alone for a minute. Although it was fun to talk with people about the lamp, I got very little work done those days.
Usually I absolutely loved the work I was doing, regardless of where I did it. I used to joke with Brian that glass work is the only activity where you routinely cut yourself and burn yourself and still have fun. I asked him, long before finishing the lamp, if he'd ever considered just selling his glass work and not running a shop, and he told me that one could never make more than $20 an hour doing that. The lamp was on display in his glass shop for about a week after I finished it, with a "Not For Sale" sign on it. Twice in that week he was offered $6,000 for the lamp by glass collectors! We had a good laugh when he told me about the offers, because we both recognized that my 300 hours of work would have amounted to exactly $20 an hour!
In Retrospect
When I finished with my Tiffany lamp, I didn't know that I was forever finished with glass work. Brian moved his shop soon thereafter. I thought that I would still do more projects, but then other things in life got in the way. I had accomplished one of the great goals in my life, and I was satisfied with what I had. I would never take on a larger project, and smaller projects didn't interest me much after finishing the lamp.
Making a 700-piece lamp took more patience than anything I've ever done, and so I am probably more proud of it than anything else I've created in my life. Every day of work presented new challenges. Many times I had almost finished cutting a piece when it broke and I had to start over with it. Sometimes I discarded finished pieces because of impurities noticed in the glass. When I finished the lamp, I thought I had completed my masterpiece. But, of course, many years later I discovered a single flaw!
While looking at the lamp one day, I noticed that one of the green pieces should have been the cream color used for the background pieces. It's the piece shown below with the glint of yellow light in the center of the photo. That piece in the other three quadrants is the correct cream color.

Although I didn't intend to make that mistake, it is only fitting that it's present. That's how all pieces of art should be, right?
I look at the lamp every day, and it continues to provide immense joy to me. As I write this, I realize that the lamp will be 25 years old next Tuesday, May 8, 2018.
No comments:
Post a Comment